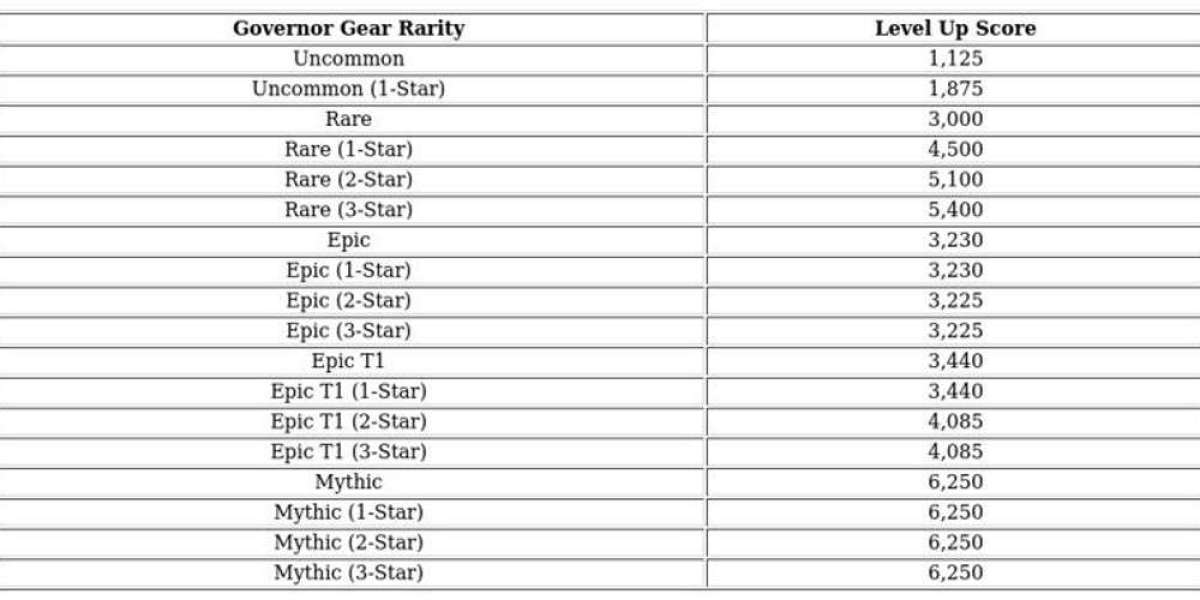
That pre-reset vault decision is where a lot of Raiders quietly win or lose the first few days after Expedition 4. It's not about stuffing in the flashiest gun and hoping for the best. You're trying to save the pieces that let you rebuild fast, craft early, and stop the usual post-reset grind from dragging on forever. If you've already got a few strong ARC Raiders BluePrints sitting around, the smart move is to think less like a collector and more like someone planning their first ten raids after the wipe.
Start With Looting Mk. 3 Survivor
Looting Mk. 3 Survivor is the kind of blueprint that doesn't look exciting until you've had to restart without it. Then you miss it straight away. Safe Pockets are huge early on, especially when everyone is fighting over scraps, parts, and whatever rare drop they can grab before extraction. The extra storage helps too, because those first runs are messy. You'll pick up Rusted Tools, Motors, Power Cables, random ARC bits, and suddenly you're overweight before you've even reached the route you planned. The medium shield is another quiet benefit. It buys you time when an encounter goes bad, and in ARC Raiders, a few seconds can be the difference between leaving with a bag full of progress or staring at the menu again. The real reason Survivor deserves vault space, though, is the crawl-to-hatch safety. Getting knocked doesn't always mean your run is dead. In PvE-heavy sessions, that mechanic saves gear, materials, and your patience.
Why Safekeeper Still Deserves A Slot
After Survivor, Looting Mk. 3 Safekeeper is worth serious thought, even if you're not saving the blueprint itself. Early account rebuilding is basically a workbench race. The faster you get your benches moving, the faster your weapons, ammo, and upgrade options stop feeling awful. Safekeeper gives you that big 65 max loadout weight, and that matters more than people admit. You can carry bulky ARC parts, heavier materials, and full loot stacks without constantly dumping useful stuff in a bush because your bag is choking. Sure, you can unlock Looting Mk. 2 with currency and use it for lighter gathering. That's fine for the first couple of trips. But once you're hauling serious components for workbench upgrades, Mk. 2 starts to feel like wearing a school backpack to move house. Safekeeper lets you make fewer trips, take better routes, and push upgrades earlier than players who are still crawling home under the weight of basic materials.
Jupiter Makes The Early ARC Grind Less Painful
Jupiter is another piece that can change the reset opening. Without it, fighting ARC enemies with early weapons like Anvil or Renegade can feel slow, loud, and expensive. You spend ammo, take risks, and still might not get the parts you came for. Bombardier Cells, Leaper Pulse Units, Rocketeer Drivers, and similar drops can become a wall if your damage output is weak. Jupiter cuts through that awkward stage. It gives you enough punch to farm ARC targets sooner, which means your workbench plan doesn't stall for half a day. There's also a nice side benefit on Harvester conditions. With Jupiter pressure, grabbing Energy Clips becomes much less of a puzzle-run chore and more of a quick in-and-out job. If things turn ugly, and they often do, pairing Jupiter with Safekeeper's Safe Pocket gives you a little insurance. You can protect the weapon instead of donating it to a bad ambush or a badly timed panic fight.
Bettina And Heavy Gun Parts Are Better Than They Look
Bettina's blueprint and the Heavy Gun Parts blueprint are not rare in the dramatic, mythic sense, but that's not the whole story. The Raider-style blueprint pool is crowded. When you're starting fresh, getting the exact pair you need can take far longer than expected. That's why saving both is such a practical play. Bettina is strong, easy to respect, and its crafting cost is pretty reasonable for what it gives you: three Canisters, three Advanced Mechanical Components, and three Heavy Gun Parts. Once Gunsmith Bench 3 is online, you don't want to be stuck waiting for blueprint luck. You want to craft, load in, and start farming properly. Some players prefer saving Anvil because it's efficient with ammo, and yeah, that argument makes sense on paper. In practice, Anvil shows up often enough on the map that you can usually get access without burning precious vault space. Bettina, on the other hand, can be annoyingly absent early unless you've pushed into the right unlocks, so banking it before reset is a cleaner plan.
Final Thoughts
A good Expedition 4 vault shouldn't be built around ego. It should be built around speed, safety, and fewer wasted raids. Looting Mk. 3 Survivor keeps you alive and protects value when a run turns sour. Safekeeper helps you haul the awkward stuff that workbenches demand. Jupiter gives you early control over ARC farming instead of making every big enemy feel like a chore. Bettina and Heavy Gun Parts remove one of the most irritating blueprint bottlenecks once your bench catches up. If you're short on time or missing pieces, picking up cheap ARC Raiders Materials can also help smooth out the rebuild, but the real edge comes from saving the tools that make your first post-reset hours cleaner, faster, and a lot less stressful.